Pupils Tab
From PatioWiki
| (One intermediate revision not shown) | |||
| Line 1: | Line 1: | ||
[[File:Edito_Pupils_en.png|right|thumb|600px|Pupils Tab]] | [[File:Edito_Pupils_en.png|right|thumb|600px|Pupils Tab]] | ||
| - | In the [[Pupils Tab]], part of the [[Edito]] application, you can create, modify or delete pupils that will | + | In the [[Pupils Tab]], a part of the [[Edito]] application, you can create, modify or delete pupils that will do the exercises of the [[Aprendo]], [[Leo]], [[Escribo]] or [[Trazo]] modules. This tab has the pupils tree on the left. In the tree there are schools from the database; inside each school there are groups and inside each group there are pupils. |
| - | In the middle zone, you can see the pupils corresponding to the selection | + | In the middle zone, you can see the pupils corresponding to the selection made in the tree. For example, if you select a school, all pupils from this school will be shown; while if you select just a group, only pupils from this group will be shown instead. Finally, in the right panel there will be shown all the data available for the pupil. |
| - | Note that is possible to change the thumbnail size and the order for pupils in the central list using the controls at the top of the | + | Note that it is possible to change the thumbnail size and the order for pupils in the central list using the controls at the top of the central panel. |
__TOC__ | __TOC__ | ||
| Line 13: | Line 13: | ||
[[File:Edito_pupils_popup_en.png|280px|thumb|right|Popup menu pupils]] | [[File:Edito_pupils_popup_en.png|280px|thumb|right|Popup menu pupils]] | ||
| - | To add a new pupil, you have to select | + | To add a new pupil, you have to select the desired group in the pupils tree and then, press the '''+''' button at the top of the tree or choose the '''Add''' option from the popup menu which appears when the tree is right clicked with the mouse. Next, you have to fill in the following fields in the panel on the right: |
| - | + | ||
; Name and Surnames | ; Name and Surnames | ||
| - | : Name and Surnames of | + | : Name and Surnames of pupil (the second surname is not mandatory). |
| - | ; | + | ; Date of birth |
| - | : | + | : Date of birth of pupil (use ''0/0/0'' from empty). |
| - | ; | + | ; Image |
: Pupil's picture. | : Pupil's picture. | ||
; Comments | ; Comments | ||
| - | : Additional information about | + | : Additional information about pupil. |
; Language | ; Language | ||
: Languages that pupil speaks/understands and his/her skill. | : Languages that pupil speaks/understands and his/her skill. | ||
| - | To confirm a new pupil | + | To confirm that a new pupil has been added, you have to press the '''Save''' button at the bottom of the panel, if you select other existing pupil, group or school instead, the addition will be discarded. |
= Modify a pupil = | = Modify a pupil = | ||
| + | To modify an existing pupil, you have to select her from the list and then, modify any data you want in the panel on the right. When the changes have been made, you have to confirm them by pressing the '''Save''' button. Like in the previous case, if you select other pupil, group or school, the unsaved modifications will be lost. | ||
| + | = Delete a pupil = | ||
| - | + | In order to delete an existing pupil, you can do one of the three things: Select it from the list and press the '''X''' button at the top of the pupils tree; choose the '''Delete''' option from the popup menu that will appear when the tree is right clicked with the mouse; or press the '''Delete''' button in the edition panel. Finally, you have to confirm the deletion in the security dialogue which will appear on the screen. Note that if the pupil has performed some exercises in the system, her record will not be deleted. In this case, it is safer to move such pupil to a predetermined group, especially created to store inactive pupils. | |
| - | + | ||
| - | + | ||
| - | + | ||
| - | + | ||
= Change the pupil group = | = Change the pupil group = | ||
| Line 43: | Line 40: | ||
[[File:Edito_group_change_en.png|260px|thumb|right|Group change dialogue]] | [[File:Edito_group_change_en.png|260px|thumb|right|Group change dialogue]] | ||
| - | + | The method for moving a pupil from group to group consists in dragging her from her current group in the pupils tree and dropping her over the target group. Then, a dialogue will be shown, so you can enter the '''Date of group change'''. | |
| - | + | Keep in mind that if you enter a future date, the pupil will stay in the current group until this date has been reached. | |
[[Category:Edito]] | [[Category:Edito]] | ||
[[es: Pestaña_Alumnos]] | [[es: Pestaña_Alumnos]] | ||
Current revision as of 14:41, 18 October 2011
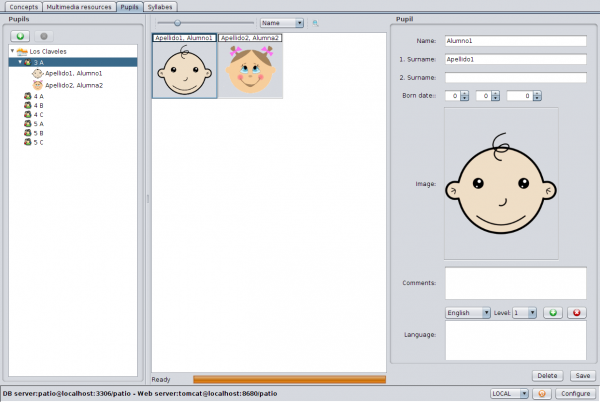
In the Pupils Tab, a part of the Edito application, you can create, modify or delete pupils that will do the exercises of the Aprendo, Leo, Escribo or Trazo modules. This tab has the pupils tree on the left. In the tree there are schools from the database; inside each school there are groups and inside each group there are pupils.
In the middle zone, you can see the pupils corresponding to the selection made in the tree. For example, if you select a school, all pupils from this school will be shown; while if you select just a group, only pupils from this group will be shown instead. Finally, in the right panel there will be shown all the data available for the pupil.
Note that it is possible to change the thumbnail size and the order for pupils in the central list using the controls at the top of the central panel.
Contents |
Add a pupil
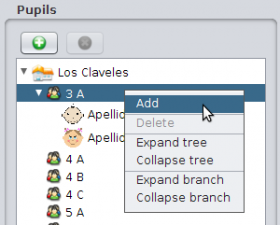
To add a new pupil, you have to select the desired group in the pupils tree and then, press the + button at the top of the tree or choose the Add option from the popup menu which appears when the tree is right clicked with the mouse. Next, you have to fill in the following fields in the panel on the right:
- Name and Surnames
- Name and Surnames of pupil (the second surname is not mandatory).
- Date of birth
- Date of birth of pupil (use 0/0/0 from empty).
- Image
- Pupil's picture.
- Comments
- Additional information about pupil.
- Language
- Languages that pupil speaks/understands and his/her skill.
To confirm that a new pupil has been added, you have to press the Save button at the bottom of the panel, if you select other existing pupil, group or school instead, the addition will be discarded.
Modify a pupil
To modify an existing pupil, you have to select her from the list and then, modify any data you want in the panel on the right. When the changes have been made, you have to confirm them by pressing the Save button. Like in the previous case, if you select other pupil, group or school, the unsaved modifications will be lost.
Delete a pupil
In order to delete an existing pupil, you can do one of the three things: Select it from the list and press the X button at the top of the pupils tree; choose the Delete option from the popup menu that will appear when the tree is right clicked with the mouse; or press the Delete button in the edition panel. Finally, you have to confirm the deletion in the security dialogue which will appear on the screen. Note that if the pupil has performed some exercises in the system, her record will not be deleted. In this case, it is safer to move such pupil to a predetermined group, especially created to store inactive pupils.
Change the pupil group
The method for moving a pupil from group to group consists in dragging her from her current group in the pupils tree and dropping her over the target group. Then, a dialogue will be shown, so you can enter the Date of group change.
Keep in mind that if you enter a future date, the pupil will stay in the current group until this date has been reached.


