Doing LEO exercises
From PatioWiki
(→Syllable Matching) |
(→Writing) |
||
| Line 48: | Line 48: | ||
= Writing = | = Writing = | ||
| - | + | The main objective of this activity is that the pupil learns the isolated pure phoneme of the letters and to know how to write them.<br /> | |
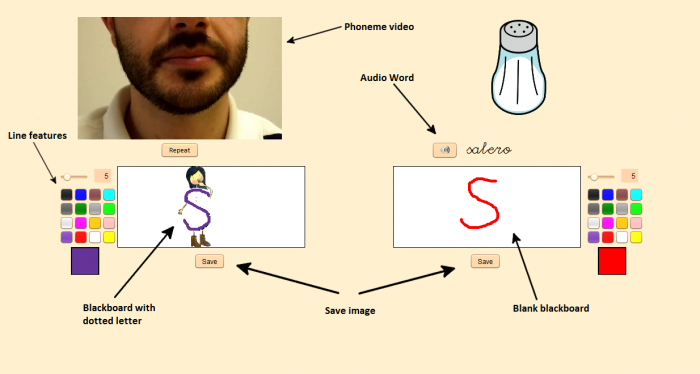
| - | + | The next image shows the user interface of the '''Writing''' activity.<br /><br /> | |
| - | [[File: | + | [[File:Ejer_Escribir_EN_LEO.png|center|thumb|700px|Writing]]<br /><br /> |
| - | + | A video with the phoneme of the letter will be available since the beginning of the activity. You can watch the video whenever you need by pressing the '''Repeat''' button.<br/> | |
| - | + | Next, the pupil has to write that letter in the two boards at the bottom of the screen. Whatever the pupil writes will be saved by pressing the '''Save''' button. The left board shows the dotted letter of '''Letrilandia''' and the pupil has to write over it, so the pupil doesn't need to identify the letter because he/she can see it. The right board is empty. The pupil can choose the '''Line features''' that he wants to use for writing (color, thickness and shape).<br/> | |
| - | + | The upper right of the screen shows a picture of a word whose first letter begins with the working letter. That word appears written below the picture and you can hear it by pressing the '''Audio Word''' button whenever you need. | |
= Listening = | = Listening = | ||
Revision as of 09:00, 23 April 2013
In this section, we will describe the main components of different types of activities and the purpose of each of them. Depending on the working mode (Learning or Evaluation) in which exercises are performed, the appearance of the interface may vary slightly (some elements disappear). The exercises are described for the learning mode since in this mode each exercise is displayed in its entirety.
Contents |
LEO Modes
LEO can be used in evaluation and learning modes. The system responds to the student's actions in a different way depending on the selected mode. The learning mode responds to the user actions telling if the action was right or wrong and the evaluation mode doesn't.
Word Understanding
With the Word Undestanding activity, the students have to understand how changing one letter of a word can form another one with completely different meanings. The teacher plays a very important role in this exercise because it is he who leads, guides and builds its development.
Below, you can see the interface of this type of activity.
The teacher has a set of letters for building words. The teacher starts building a word and he/she has to make changes in the meaning of that word by changing a letter. The pupil shouldn't see the change on the word and find the changed letter. It is important to emphasize the importance of each letter and the order of placing them. Visual memory, directly related with hearing memory, will be constantly exercised because the pupil has to remember, one time after another, the replaced letters.
After you build a word, you have to press the ShowImage button and an image collection will appear at the bottom of the screen. The pupil have to select the image that is associated with the word. Also, the sound of the word can be played in Spanish or English.
There is also a section of the screen that will be showing all the words that have been built. This way, the child never loses sight of all the words that can be formed from those letters.
Word Building
The main objective of this activity is that the pupils get to build words by selecting their letters. In order to build it, the pupil will have only the sound and the image of the word as a reference.
Something that characterizes this type of activity is that each of the letters that the student is on-screen picking corresponds to a letter-character of the Letrilandia method.
Next, you can see the user interface of this activity.
At the upper of the screen, there is a Letter Collection where the pupil has to select the letters to build the word.
At the left of the screen, there is an Image Set that contains the words that can be used in the exercise. By pressing on them, the same image will appear in a bigger size together with the AudioWord button at the Objective Support Area. By pressing the AudioWord button you can listen the sound of the word whenever you need.
The lower zone have three control elements:
- Size Slider: Allows you to modify the size of the characters of Letrilandia that will be entering the screen.
- Delete Button: By pressing this button, the last letter added by the pupil will be removed.
- Correct Exercise Button: By pressing this button, the word built by the pupil will be checked. On the one hand, If the pupil has built the word without any error, the letters-characters will shake their hands and walk together to the right of the screen until they dissapear. On the other hand, if the pupil makes any error, the wrong letters will say 'no' with their heads and they will be the only ones walking to the right of the screen. In addition, the Word Support Area, at the lower right of the screen, will show the image and the sound of the word or a question mark if the word doesn't exists. The pupil will have to add new letters and fill the gaps of the last wrong letters.
Word Matching
The objective of this activity is that pupils work with the meaning-significant association. It is focused on the word as a linguistic unit.
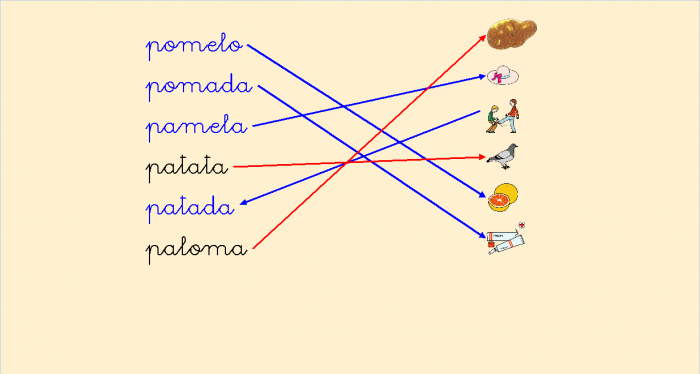
The next image shows the aspect of this activity.
There are two columns on the screen. The left one is composed by words and the other one by images. Each image is associated with one of the words. The pupil have to draw arrows from the left column to the right, or vice versa, to match the word with the image.
To make the arrows you have to press over one of the column items and, without releasing it, drag the item to another item from the other column.
When the association is correct, the arrow and the word turn blue and you can listen the sound of the matched word. When the association is incorrect, the arrow turns red and you can listen an error message.
Syllable Matching
This activity try to work the meaning-significant association by visual discrimination spellings.
This activity presents words without its last syllable. The activity presents the next word without its last syllable and the pupil have to choose, from a words collection, the correct syllable in order to complete the word.
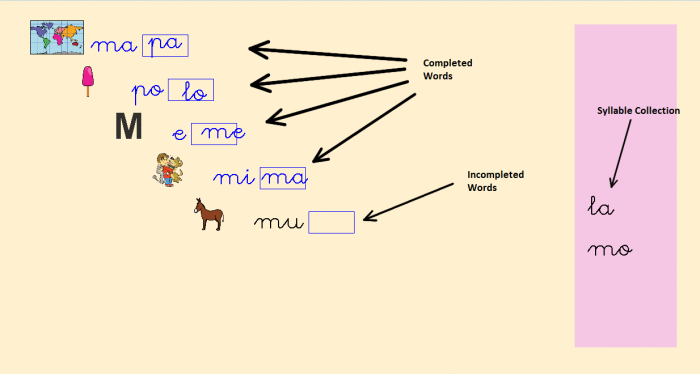
The next image shows the user interface of this activity.
The pupil have to use the syllables located in the Syllable Colection zone and complete the word associated with the image that appears. The words are composed by two syllables and the pupils have to complete the second one. The pupil has to press over the selected syllable and, without releasing it, drag and drop it over the last empty box of the last word, next to the first syllable.
When the syllable placed into the box is correct, a sound of success will be played and the letter turns blue. Otherwise, a warning sound will be played and the syllable turns red.
The activity will present a maximum of seven images.
Writing
The main objective of this activity is that the pupil learns the isolated pure phoneme of the letters and to know how to write them.
The next image shows the user interface of the Writing activity.
A video with the phoneme of the letter will be available since the beginning of the activity. You can watch the video whenever you need by pressing the Repeat button.
Next, the pupil has to write that letter in the two boards at the bottom of the screen. Whatever the pupil writes will be saved by pressing the Save button. The left board shows the dotted letter of Letrilandia and the pupil has to write over it, so the pupil doesn't need to identify the letter because he/she can see it. The right board is empty. The pupil can choose the Line features that he wants to use for writing (color, thickness and shape).
The upper right of the screen shows a picture of a word whose first letter begins with the working letter. That word appears written below the picture and you can hear it by pressing the Audio Word button whenever you need.
Listening
Los ejercicios del tipo Escuchar pueden ser mostrados de dos formas diferentes. La diferencia entre ambos es que a la hora de reconocer el concepto con el que se está trabajando aparecerá un Audio o un Video; todo lo demás permanece común en ambas versiones.
A continuación, se muestra la interfaz de ambos modos.
El alumno irá escuchando el nombre de conceptos y los tendrá que ir reconociendo de entre el conjunto de imágenes mostradas en la parte inferior. El modo de reconocerlas es pulsando sobre ellas. Al pulsar sobre la imagen correcta se emite un sonido de aprobación, en caso contrario, se oirá un mensaje para indicar que el alumno se ha confundido.
Pulsando sobre el botón Audio Concepto Objetivo se podrá escuchar tantas veces como se necesite el concepto con el que se esté trabajando en ese momento. Si se pulsa el botón Repetir, se volverá a reproducir el vídeo.
Las imágenes mostradas no se barajan en la pantalla, es decir, permanecen inmóviles y siempre en la misma posición.
Letter Cloud
Los ejercicios del tipo Nube de Letras presentan el siguiente aspecto:
Son dos los objetivos a tratar trabajando con esta actividad:
- Conciencia Fonémica (parte izquierda). El alumno deberá responder a la pregunta que se le formule asociada al dibujo que se muestra en la parte superior de la pantalla.
Las preguntas que se escuchará tendrá la siguiente estructura: <palabra>, “¿Está <sonido_fonema> en <palabra>?
El alumno podrá escuchar la pregunta tantas veces como necesite pulsando sobre el botón “?”. Del mismo modo, escuchará la palabra asociada al dibujo pulsando sobre el botón AudioPalabra. Mediante los botones de la parte inferior izquierda de la pantalla, el alumno responderá a las preguntas (Si / No).
En este modo de trabajo (Aprendizaje), las imágenes son elegidas de manera aleatoria. Habrá un máximo de 6 imágenes-preguntas procurando el mismo número de emparejamientos positivos que negativos. Para pasar a la siguiente pareja imagen-pregunta, se deberá pulsar sobre el botón de la flecha situado en el centro de la parte superior de la pantalla.
- Si el alumno responde correctamente, aparecerá la palabra escrita debajo del dibujo y habrá refuerzo sonoro.
- Si por el contrario, el alumno responde incorrectamente, sólo habrá un refuerzo sonoro.
- Principio alfabético (parte derecha). El alumno escuchará el audio del fonema de una letra y deberá señalarla tantas veces como aparezca dentro de la nube (cada ejercicio trabajará sobre un único fonema).
Mediante el botón de AudioFonema que hay debajo de la nube, el alumno podrá escuchar tantas veces como necesite el fonema de la letra con la que se esté trabajando en el ejercicio.
- Si el alumno pulsa sobre una letra correcta; habrá refuerzo sonoro, desaparecerá la letra pulsada de la nube e incrementará el contador de aciertos de la parte inferior de la plantilla.
- Si el alumno pulsa sobre una letra incorrecta, habrá refuerzo sonoro y la letra pulsada no desaparecerá.
Order the sentence
El objetivo de la actividad Ordenar Frase consiste en construir una frase mediante la ordenación de sus palabras. El ejercicio requiere de una comprensión lectora que permita enlazar las palabras dadas, formando una secuencia coherente.
La siguiente imagen muestra la interfaz gráfica que describe esta actividad.
El alumno se encuentra con las Palabras Desordenadas de la frase dispuestas de forma aleatoria. El alumno tendrá que pulsar sobre la palabra que quiera colocar, y sin soltarla, la arrastrará hasta uno de los recuadros azules situados en la parte inferior de la pantalla. Cada uno de estos recuadros representa una posición concreta dentro de la frase que hay que construir.
El alumno contará con varias referencias que le guiarán en la realización del ejercicio. La Primera Referencia es que la primera palabra de la frase comienza por mayúscula. La Segunda Referencia es que la última palabra de la frase acaba con un punto. Por último, la Tercera Referecia es la aparición en el centro de la pantalla de una imagen que tiene relación con la frase a ordenar.
Cuando la palabra colocada sea la correcta, ésta cambiará su color (de negro a azul) y se emitirá un sonido de aprobación. En caso contrario, la palabra se volverá roja y se escuchará otro sonido que le dará a entender al alumno que el orden tomado no es el correcto.


