Concepts Tab
From PatioWiki
| Line 1: | Line 1: | ||
[[File:Edito_concepts01_en.png|right|thumb|600px|Concepts Tab]] | [[File:Edito_concepts01_en.png|right|thumb|600px|Concepts Tab]] | ||
| - | In the [[Concepts Tab]], part of the [[Edito]] application, | + | In the [[Concepts Tab]], part of the [[Edito]] application, you can create, modify or delete concepts. Besides, concepts can be related each other or even create a new sort of type of relation. Finally, in this tab you will be able to assign multimedia resources to a new concept very easy. |
| - | Note that concepts must have a description in the same language as the user interface in order to be well shown in the concept tree. | + | Note that concepts <u>must have</u> a description in the same language as the user interface in order to be well shown in the concept tree. |
__TOC__ | __TOC__ | ||
| Line 9: | Line 9: | ||
= Concept Panel = | = Concept Panel = | ||
| - | In this panel, concepts | + | In this panel you can add, modify or delete concepts. According to the operation in course field colour will change to green, if the user is adding a new concept or <u>it will change to</u> yellow, if it is in edition mode. |
== Add a new concept == | == Add a new concept == | ||
| Line 15: | Line 15: | ||
[[File:Edito_concepts_popup_en.png|220px|thumb|right|Concept Popup Menu]] | [[File:Edito_concepts_popup_en.png|220px|thumb|right|Concept Popup Menu]] | ||
| - | Concepts can be added using the '''+''' button at the top side of the concept tree or choosing '''Add''' from the popup menu shown when the tree is <u>right clicked</u> with the mouse. With the panel in edition mode (field boxes in green) a name for the concept | + | Concepts can be added using the '''+''' button at the top side of the concept tree or choosing '''Add''' from the popup menu shown when the tree is <u>right clicked</u> with the mouse. With the panel in edition mode (field boxes in green) you must write a name for the concept in at least one of the available languages. The <u>check box</u> '''Relations''' can be checked so when the concept is saved, the default relations ''begins with'', ''contains'' and ''ends with'' will be created too. You have to press the '''Save''' button to confirm the concept addition <u>meanwhile</u> to abort changes, '''Cancel''' button has to be pressed <u>instead</u>. |
== Modify a concept == | == Modify a concept == | ||
| - | To modify an existing concept, | + | To modify an existing concept, you have to select it from the concept tree in order to the modifications can be done inside the edition panel. Note that the panel automatically changes to edition mode (yellow colour) when you modify something. In the same way as when you add new concepts, you have to confirm your changes pressing the '''Save''' button or cancel them using the '''Cancel''' button. |
== Delete a concept == | == Delete a concept == | ||
| - | In order to delete an existing concept, it | + | In order to delete an existing concept, you have to select it from the concept tree and press the '''X''' button at the top of the tree or <u>to</u> choose '''Delete''' from the popup menu shown when the tree is <u>right clicked</u> with the mouse. Finally, you have to confirm the deletion in the security dialogue shown. Note that this deletion includes to delete the concept relations of the concept and its multimedia resources assigned. |
= Concept - Resources Panel = | = Concept - Resources Panel = | ||
| - | [[File:Edito_concepts_multimedia_resources_en.png|right|thumb|400px|Multimedia Resources | + | [[File:Edito_concepts_multimedia_resources_en.png|right|thumb|400px|Multimedia Resources Assigned]] |
| - | In the lower panel, <u>titled</u> '''Concept - Resources''', multimedia resources | + | In the lower panel, <u>titled</u> '''Concept - Resources''', you can view the multimedia resources assigned to the selected concept. To assign a new multimedia resource from the database to the selected concept, you have to firstly select it from the side panel which is shown using the '''+''' button placed in the lower panel and next, when you had select the multimedia resource, you have to drag and drop it into the lower panel. Note that the side panel has several filters in order to help find the desired multimedia resource. |
| - | For deleting | + | For deleting a multimedia resource assignation from a concept, it has to be selected in the '''Concept - Resources''' panel, press the '''Del''' key on the keyboard and finally confirm the security question shown. |
= Relations between concepts = | = Relations between concepts = | ||
| - | Concepts can be related | + | Concepts can be related each to other so the features of the project application can be improved. Relations between concepts are managed from the <u>upper right</u> panel. There, you can relate concepts in the '''Relations''' tab or create new relation types, modify or delete the existing ones, in the '''Relation types''' tab. |
== Relations Tab == | == Relations Tab == | ||
| Line 45: | Line 45: | ||
=== Add a new relation between concepts === | === Add a new relation between concepts === | ||
| - | + | To make a relation between concepts, the source | |
Para relacionar una concepto con otro se debe seleccionar el concepto origen en el árbol de conceptos, luego en el panel de '''Relaciones''' se escogerá el tipo de relación y el concepto destino añadiéndose la relación al pulsar el botón '''+''' contenido en este panel. Ahora el concepto se encuentra en modo edición (color amarillo) pudiéndose añadir más relaciones o realizar otros cambios al mismo y debiéndose pulsar sobre el botón '''Aceptar''' para confirmar todos cambios realizados, o bien en '''Cancelar''' para descartarlos. | Para relacionar una concepto con otro se debe seleccionar el concepto origen en el árbol de conceptos, luego en el panel de '''Relaciones''' se escogerá el tipo de relación y el concepto destino añadiéndose la relación al pulsar el botón '''+''' contenido en este panel. Ahora el concepto se encuentra en modo edición (color amarillo) pudiéndose añadir más relaciones o realizar otros cambios al mismo y debiéndose pulsar sobre el botón '''Aceptar''' para confirmar todos cambios realizados, o bien en '''Cancelar''' para descartarlos. | ||
Revision as of 11:13, 22 September 2011
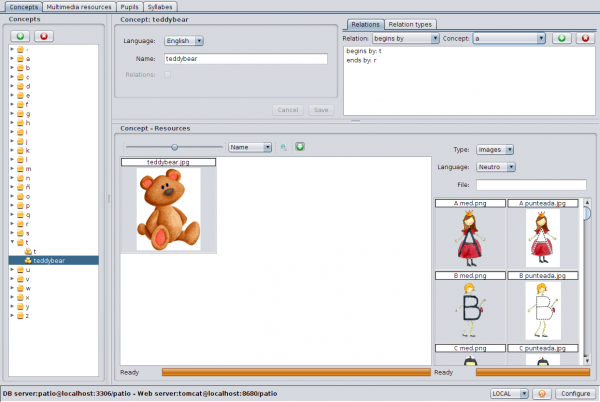
In the Concepts Tab, part of the Edito application, you can create, modify or delete concepts. Besides, concepts can be related each other or even create a new sort of type of relation. Finally, in this tab you will be able to assign multimedia resources to a new concept very easy.
Note that concepts must have a description in the same language as the user interface in order to be well shown in the concept tree.
Contents |
Concept Panel
In this panel you can add, modify or delete concepts. According to the operation in course field colour will change to green, if the user is adding a new concept or it will change to yellow, if it is in edition mode.
Add a new concept
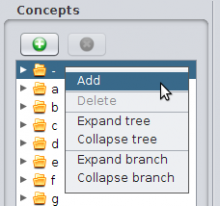
Concepts can be added using the + button at the top side of the concept tree or choosing Add from the popup menu shown when the tree is right clicked with the mouse. With the panel in edition mode (field boxes in green) you must write a name for the concept in at least one of the available languages. The check box Relations can be checked so when the concept is saved, the default relations begins with, contains and ends with will be created too. You have to press the Save button to confirm the concept addition meanwhile to abort changes, Cancel button has to be pressed instead.
Modify a concept
To modify an existing concept, you have to select it from the concept tree in order to the modifications can be done inside the edition panel. Note that the panel automatically changes to edition mode (yellow colour) when you modify something. In the same way as when you add new concepts, you have to confirm your changes pressing the Save button or cancel them using the Cancel button.
Delete a concept
In order to delete an existing concept, you have to select it from the concept tree and press the X button at the top of the tree or to choose Delete from the popup menu shown when the tree is right clicked with the mouse. Finally, you have to confirm the deletion in the security dialogue shown. Note that this deletion includes to delete the concept relations of the concept and its multimedia resources assigned.
Concept - Resources Panel
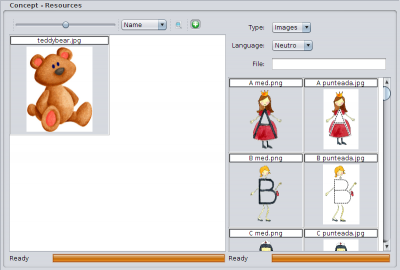
In the lower panel, titled Concept - Resources, you can view the multimedia resources assigned to the selected concept. To assign a new multimedia resource from the database to the selected concept, you have to firstly select it from the side panel which is shown using the + button placed in the lower panel and next, when you had select the multimedia resource, you have to drag and drop it into the lower panel. Note that the side panel has several filters in order to help find the desired multimedia resource.
For deleting a multimedia resource assignation from a concept, it has to be selected in the Concept - Resources panel, press the Del key on the keyboard and finally confirm the security question shown.
Relations between concepts
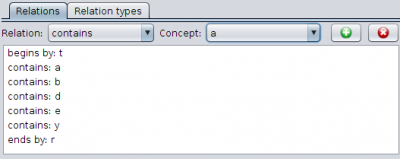
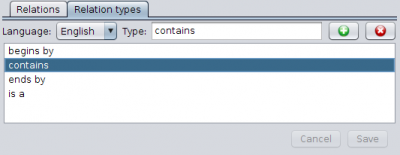
Concepts can be related each to other so the features of the project application can be improved. Relations between concepts are managed from the upper right panel. There, you can relate concepts in the Relations tab or create new relation types, modify or delete the existing ones, in the Relation types tab.
Relations Tab
In this tab relations between concepts are managed.
Add a new relation between concepts
To make a relation between concepts, the source Para relacionar una concepto con otro se debe seleccionar el concepto origen en el árbol de conceptos, luego en el panel de Relaciones se escogerá el tipo de relación y el concepto destino añadiéndose la relación al pulsar el botón + contenido en este panel. Ahora el concepto se encuentra en modo edición (color amarillo) pudiéndose añadir más relaciones o realizar otros cambios al mismo y debiéndose pulsar sobre el botón Aceptar para confirmar todos cambios realizados, o bien en Cancelar para descartarlos.
Existe un método más intuitivo para establecer la relación es un entre conceptos que consiste en arrastrar dentro del árbol de conceptos el concepto origen de la relación es un sobre el concepto destino estableciendo así la relación. Nótese que la relación es un se representa en el árbol de conceptos como una jerarquía de elementos.
Eliminar una relación de un concepto
Para eliminar una relación de un concepto se lo debe seleccionar desde el árbol de conceptos y luego seleccionar en el panel de Relaciones la relación a eliminar, pulsando a continuación en el botón X de este panel. De igual modo que en el caso anterior, el concepto pasa a estar en modo edición debiéndose pulsar sobre el botón Aceptar para confirmar los cambios o en Cancelar para descartarlos.
Pestaña Tipos de Relaciones
Desde esta pestaña se gestionan los tipos de relaciones.
Añadir un nuevo tipo de relación
Para añadir un nuevo tipo de relación se deberá seleccionar la pestaña Tipos de Relaciones y una vez allí pulsar sobre el botón + para introducir el nombre de la relación en el idioma seleccionado. Para confirmar la operación se deberá pulsar sobre el botón Aceptar o sobre el botón Cancelar para cancelarla.
Modificar un tipo de relación
Para modificar un tipo de relación se lo deberá seleccionar en la pestaña Tipos de Relaciones procediéndose a modificar los textos en los idiomas disponibles. Nuevamente con el botón Aceptar se confirmarán los cambios y con el botón Cancelar se descartarán.
Eliminar un tipo de relación
Para eliminar un tipo de relación, primero se lo seleccionará dentro de la pestaña Tipos de Relaciones y luego se pulsará sobre el botón X debiéndose confirmar la operación en el diálogo que se visualiza a estos efectos.
