Multimedia Resources
From PatioWiki
| Line 37: | Line 37: | ||
Note that each multimedia resource can be associated with several files (one for each language) in order to provide specific representations for all the available languages. | Note that each multimedia resource can be associated with several files (one for each language) in order to provide specific representations for all the available languages. | ||
| - | Finally, you have to keep in mind that if you add a concept to the '''Association List''', you will get the same results as by dragging the multimedia resource over the '''Concepts - Resources Panel''' | + | Finally, you have to keep in mind that if you add a concept to the '''Association List''', you will get the same results as by dragging the multimedia resource over the '''Concepts - Resources Panel''' (view [[Concepts]] section). |
| - | === | + | === Delete a multimedia resource === |
| - | + | In order to delete a multimedia resource, you have to select it from the resources list and press the '''Delete''' button. Then, you have to confirm the deletion in the security dialogue that will appear on the screen. | |
| + | == Add Resources == | ||
| - | + | In this tab, you can add multimedia resources to the database one by one. | |
| - | + | First, you have to select the source directory where the multimedia files are. To do it, use the button with the folder icon or write the complete path in the text field which is located next to the button. When the multimedia files appear you can select one of them and add it to the database. Before ending this operation, you have to complete the following resource fields: | |
| - | + | ; Type | |
| + | : The type of the multimedia resource. | ||
| + | ; Language | ||
| + | : The language <u>in which</u> the resource can be used. | ||
| + | ; Associations | ||
| + | : The optional list of concepts associations. | ||
| + | ; Multimedia resources | ||
| + | : This list determines if the new file is a new multimedia resource ('''New''' option) or a part of the translation of an existing multimedia resource into another language. | ||
| - | |||
| - | |||
| - | |||
| - | |||
| - | |||
| - | |||
| - | |||
| - | |||
| - | + | To confirm the addition of a new resource (or the translation into the selected language), you have to press the '''Add''' button at the bottom of the panel. | |
| - | + | Note that the multimedia resources shown in the list of the edition panel depend on the language that you have chosen for the file. Furthermore, you cannot add more than one file of the same language to one particular multimedia resource. | |
| - | [[ | + | [[File:Edito_recursos_anadir_en.png|thumb|center|600px|Add Resources Tab]] |
| - | == | + | == Add Batch Tab == |
| - | + | In this tab, you can add many multimedia resources to the database at the same time. | |
| - | + | Like in the previous case, you have to select the source directory which contains the multimedia files. | |
| - | + | To select the desired files individually, press '''CTRL''' key and left-click on the mouse. To select a range of consecutive files, press '''Shift''' and left-click. When you have selected all the desired files, go to the panel on the right and choose the options that will be used by the batch process: | |
| - | + | ||
| - | + | ||
| - | + | ||
| - | + | ||
| - | + | ||
| - | + | ; Language | |
| + | : The language in which the resource can be used. | ||
| + | ; Concepts | ||
| + | : By checking this checkbox, a new concept will be created for each multimedia file (if it doesn't already exist). Each new concept will be named after its multimedia file. In addition, each new multimedia resource will be associated with the corresponding concept. | ||
| + | ; Relations | ||
| + | : If you check this checkbox, the default relations "begins with", "contains" and "ends with" will be created when the concept is saved. That will only happen if the '''Concepts''' checkbox is also checked. | ||
| - | + | The last remaining step is pressing the '''Add''' button. As a result, the batch of multimedia resources is added to the database. | |
| + | Observe that this method cannot be used to add translation files to current multimedia resources. That task can only be done in the '''Add Resources''' tab. | ||
| - | [[ | + | |
| + | [[File:Edito_recursos_lote_en.png|thumb|center|600px|Add Batch Tab]] | ||
Revision as of 08:17, 6 May 2013
To access the panel that allows the management of the multimedia resources that will be used in PATIO, you have to press the Multimedia resources button located at the Importer/Exporter panel.
This panel is divided into tabs that allow you to create, modify or delete multimedia resources. Besides, resources can be associated with concepts or you can even add new files of different languages to an existing multimedia resource. Finally, there is another important feature that allows you to import/export packages of multimedia resources so you can export a package from a database and import it to another one and vice versa.
Note that multimedia resources must have a description in the same language as the user interface, or in the neutral language, in order to be correctly displayed in the multimedia resource tree.
Contents |
Modify Resources
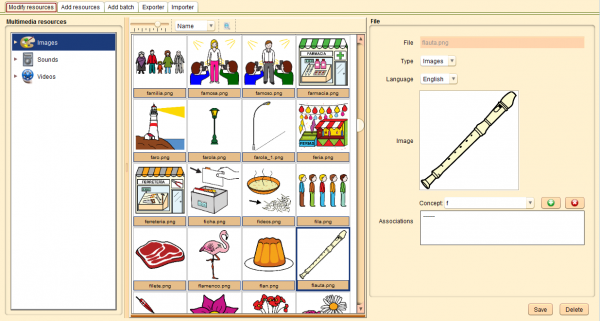
This tab contains the multimedia resource tree on the left; the resources list showing the resources filtered by the current selection, in the central zone; and the details of the chosen file, in the panel on the right.
Note that you can change the preview size and the order of the multimedia resources in the central list using the controls at the top of the central panel.
Cada fichero consta de los siguientes campos:
Each file has the following fields:
- File
- The name of the multimedia file.
- Type
- The type of the multimedia resource.
- Language
- The language in which the resource can be used.
- Image
- The image that represents the multimedia resource.
- Associations
- The list of concepts that this resource represents.
Modify a multimedia resource
To modify an existing multimedia resource, you have to select it from the resources list, make the desired modifications and finally press the Save button to confirm changes.
Note that each multimedia resource can be associated with several files (one for each language) in order to provide specific representations for all the available languages.
Finally, you have to keep in mind that if you add a concept to the Association List, you will get the same results as by dragging the multimedia resource over the Concepts - Resources Panel (view Concepts section).
Delete a multimedia resource
In order to delete a multimedia resource, you have to select it from the resources list and press the Delete button. Then, you have to confirm the deletion in the security dialogue that will appear on the screen.
Add Resources
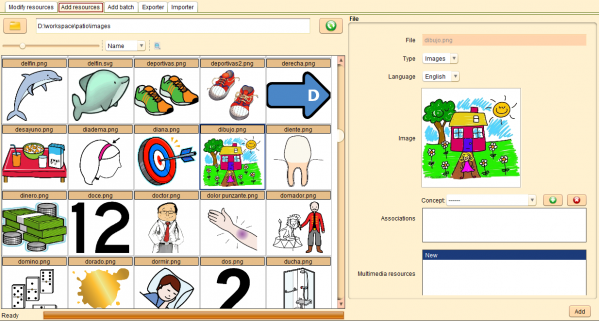
In this tab, you can add multimedia resources to the database one by one.
First, you have to select the source directory where the multimedia files are. To do it, use the button with the folder icon or write the complete path in the text field which is located next to the button. When the multimedia files appear you can select one of them and add it to the database. Before ending this operation, you have to complete the following resource fields:
- Type
- The type of the multimedia resource.
- Language
- The language in which the resource can be used.
- Associations
- The optional list of concepts associations.
- Multimedia resources
- This list determines if the new file is a new multimedia resource (New option) or a part of the translation of an existing multimedia resource into another language.
To confirm the addition of a new resource (or the translation into the selected language), you have to press the Add button at the bottom of the panel.
Note that the multimedia resources shown in the list of the edition panel depend on the language that you have chosen for the file. Furthermore, you cannot add more than one file of the same language to one particular multimedia resource.
Add Batch Tab
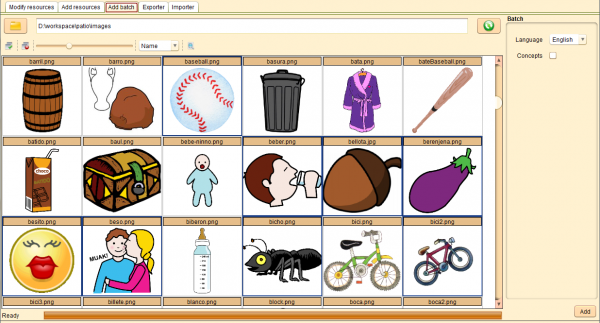
In this tab, you can add many multimedia resources to the database at the same time.
Like in the previous case, you have to select the source directory which contains the multimedia files.
To select the desired files individually, press CTRL key and left-click on the mouse. To select a range of consecutive files, press Shift and left-click. When you have selected all the desired files, go to the panel on the right and choose the options that will be used by the batch process:
- Language
- The language in which the resource can be used.
- Concepts
- By checking this checkbox, a new concept will be created for each multimedia file (if it doesn't already exist). Each new concept will be named after its multimedia file. In addition, each new multimedia resource will be associated with the corresponding concept.
- Relations
- If you check this checkbox, the default relations "begins with", "contains" and "ends with" will be created when the concept is saved. That will only happen if the Concepts checkbox is also checked.
The last remaining step is pressing the Add button. As a result, the batch of multimedia resources is added to the database.
Observe that this method cannot be used to add translation files to current multimedia resources. That task can only be done in the Add Resources tab.
Exportador de paquetes de recursos multimedia
La pestaña Exportador permite la creación de paquetes de recursos multimedia existentes en la base de datos con la que se está trabajando. Un paquete es un fichero que contiene toda la información necesaria de los recursos multimedia que incluye y que podrá ser importado desde otra base de datos.
thumb|center|600px|Exportador de paquetes de recursos multimedia
Añadir recursos multimedia al paquete
Los recursos multimedia pueden ser seleccionados utilizando el árbol Recursos multimedia situado a la izquierda y el panel central, que muestra los recursos multimedia seleccionados en el árbol Recursos multimedia. Los recursos que se deseen añadir al paquete deben ser seleccionados en el panel central y arrastrados con el botón principal del ratón hasta el panel Recursos multimedia seleccionados, donde se soltará el botón para terminar de añadir el recurso multimedia al paquete.
Quitar recursos multimedia del paquete
Para quitar recursos multimedia del paquete basta con seleccionar los recursos que se desean eliminar y pulsar el botón Eliminar situado en la barra de herramientas del panel Recursos multimedia seleccionados o bien presionar la tecla Supr del teclado.
thumb|center|400px|Botón quitar recursos
Exportar el paquete
Para proceder a la creación del paquete con los recursos multimedia que se han seleccionado se debe pulsar el botón Exportar situado en la parte inferior del panel Recursos multimedia seleccionados. A continuación, aparecerá una nueva ventana que permitirá seleccionar el nombre del paquete y el lugar donde se desea almacenar.
Nota: El paquete incluye los recursos multimedia seleccionados, así como todos sus conceptos asociados y los ficheros con sus imágenes, sonidos y/o vídeos.
Importador de paquetes de recursos multimedia
La pestaña Importador permite la importación de paquetes de recursos multimedia que hayan sido creados utilizando el exportador de paquetes.
thumb|center|700px|Importador de paquetes de recursos multimedia
En primer lugar, se pulsará sobre el botón Seleccionar paquete para buscar el paquete de recursos multimedia que se desea importar. Una vez seleccionado, su información aparecerá en el apartado Información del paquete. Por último, se pulsará el botón Importar recursos para comenzar el proceso de importación. El panel inferior irá mostrando el progreso e información sobre la importación.
Nota: La importación de recursos multimedia incluye, además, la importación de todos sus conceptos asociados en la base de datos en la que se creó el paquete y sus ficheros con las imágenes, sonidos y/o vídeos.


