Import/Export resources
From PatioWiki
| Line 136: | Line 136: | ||
This panel is divided into tabs that allow you to create, modify or delete multimedia resources. Besides, resources can be associated with concepts or you can even add new files of different languages to an existing multimedia resource. Finally, there is another important feature that allows you to import/export packages of multimedia resources so you can export a package from a database and import it to another one and vice versa. | This panel is divided into tabs that allow you to create, modify or delete multimedia resources. Besides, resources can be associated with concepts or you can even add new files of different languages to an existing multimedia resource. Finally, there is another important feature that allows you to import/export packages of multimedia resources so you can export a package from a database and import it to another one and vice versa. | ||
| - | Note that multimedia resources must have a description in the same language as the user interface, or in the ''neutral'' language, in order to be | + | Note that multimedia resources must have a description in the same language as the user interface, or in the ''neutral'' language, in order to be correctly displayed in the multimedia resource tree. |
| - | == | + | == Modify Resources == |
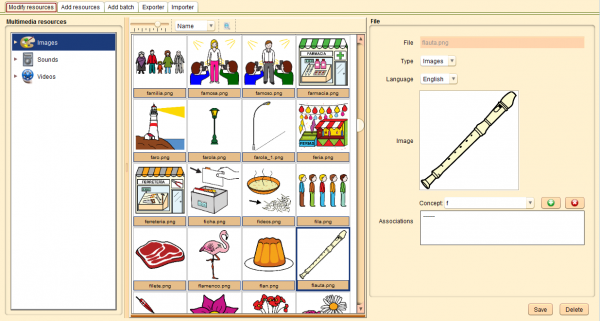
| - | + | This tab contains the multimedia resource tree on the left; the resources list showing the resources filtered by the current selection, in the central zone; and the details of the chosen file, in the panel on the right. | |
| - | + | Note that you can change the preview size and the order of the multimedia resources in the central list using the controls at the top of the central panel. | |
Cada fichero consta de los siguientes campos: | Cada fichero consta de los siguientes campos: | ||
| - | + | Each file has the following fields: | |
| - | : | + | |
| - | + | ||
| - | + | ||
| - | + | ||
| - | + | ||
| - | + | ||
| - | + | ||
| - | + | ||
| - | + | ||
| + | ; File | ||
| + | : The name of the multimedia file. | ||
| + | ; Type | ||
| + | : The type of the multimedia resource. | ||
| + | ; Language | ||
| + | : The language in which the resource can be used. | ||
| + | ; Image | ||
| + | : The image that represents the multimedia resource. | ||
| + | ; Associations | ||
| + | : The list of concepts that this resource represents. | ||
| - | |||
| + | [[File:Edito_recursos_modificar01_en.png|thumb|center|600px|Modify Resources Tab]] | ||
| - | |||
| - | + | === Modify a multimedia resource === | |
| - | + | To modify an existing multimedia resource, you have to select it from the resources list, make the desired modifications and finally press the '''Save''' button to confirm changes. | |
| - | + | Note that each multimedia resource can be associated with several files (one for each language) in order to provide specific representations for all the available languages. | |
| + | |||
| + | Finally, you have to keep in mind that if you add a concept to the '''Association List''', you will get the same results as by dragging the multimedia resource over the '''Concepts - Resources Panel''' in the [[Concepts Tab]]. | ||
Revision as of 07:04, 6 May 2013
PATIO includes some resources to use for creating exercises. These resources can be customized in order to be used when designing more specific exercises attending to the children’s learning needs.
To access these functions, you have to press the Import/Export button located at the teacher's desktop and the Importer/Exporter panel will appear.
Contents
|
Concepts
To access the panel that allows the management of the concepts that will be used in PATIO, you have to press the Concepts button located at the Importer/Exporter panel.
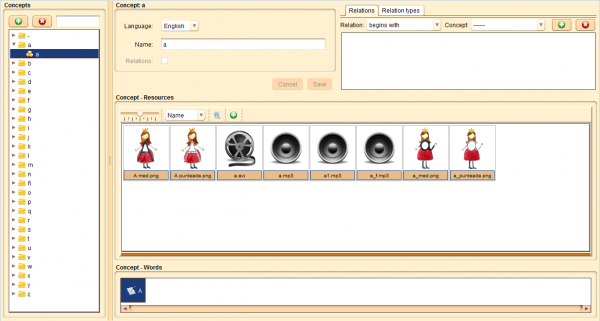
In this panel, you can create, modify or remove concepts. In addition, you can associate concepts to each other or create new type of relations. It is also possible to assign multimedia resources to concepts very easyly.
Note that concepts must have a description in the same language as the user interface in order to be well shown in the concept tree.
Concepts Panel
In this panel, you can add, modify or delete concepts. According to the operation in course, field colour will change to green if the user is adding a new concept or it will change to yellow if it is in editing mode.
Add a new concept
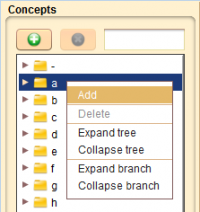
Concepts can be added using the + button at the top of the concept tree or choosing Add from the popup menu shown when the tree is right clicked with the mouse. When the panel is in editing mode (field boxes in green), you must write a name for the concept in at least one of the available languages. If you check the checkbox Relations, the default relations "begins with", "contains" and "ends with" will be created when the concept is saved. You have to press the Save button to confirm the concept addition while to abort changes, Cancel button has to be pressed instead.
Modify a concept
To modify an existing concept, you have to select it from the concept tree so that the modifications can be done inside the editing panel. Note that the panel automatically changes to editing mode (yellow colour) when you modify something. In the same way as when you add new concepts, you have to confirm the changes by pressing the Save button or cancel them using the Cancel button.
Delete a concept
In order to delete an existing concept, you have to select it from the concept tree and press the X button at the top of the tree or to choose Delete from the popup menu shown when the tree is right clicked with the mouse. Finally, you have to confirm the deletion in the security dialogue which will appear on the screen. Note that this operation implies deleting also the concept relations of the concept and the multimedia resources assigned to it.
Concept - Resources Panel
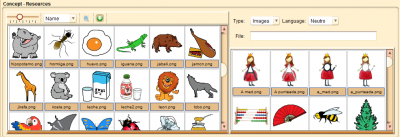
In the center panel, the one with the Concept - Resources title, you can view the multimedia resources assigned to the selected concept. To assign a new multimedia resource from the database to the selected concept, you have to first select it from the side panel which appears when you press the + button placed in the lower panel. Next, when you have selected the multimedia resource, you have to drag and drop it into the center panel. Note that the side panel has several filters in order to help you find the desired multimedia resource.
To delete a multimedia resource assignation from a concept, you have to select it from the Concept - Resources panel, press the Del key on the keyboard and finally confirm the security question that will appear on the screen.
Relations between concepts
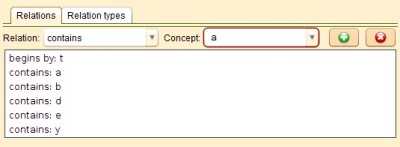
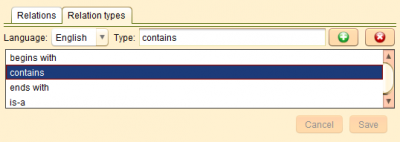
In order to improve the features of the project, concepts can be related to each other. Relations between concepts are managed from the top right panel. There, you can relate concepts in the Relations tab or create new relation types, modify or delete the existing ones in the Relation types tab.
Relations Tab
In this tab, relations between concepts are managed.
Add a new relation between concepts
To make a relation between concepts, you have to select the source concept from the concept tree. Then you have to choose the relation type and the target concept in the Relations panel. Finally, you have to press the + button in this panel to add a new relation. Now, the concept panel is in editing mode (yellow colour), therefore you could add more relations or even make other changes to the concept before pressing the Save button in order to confirm all these changes, including the new relations. Of course, you can press the Cancel button to discard the changes at any time.
There is a more intuitive method of establishing the "is-a" relation. It consists in dragging inside the concept tree the source concept and dropping it over the target one; this will add a new relation between these concepts. Note that the "is-a" relation is shown in the concept tree as a hierarchy of elements.
Delete a concept relation
To delete a concept relation, you have to select it from the concept tree, then you have to select in the Relations panel the relation to be deleted and finally, you have to press the X button of this panel. In the same way as in the previous case, the concept goes to editing mode, so to end the deletion process, you have to press on the Save button to confirm the changes, or on the Cancel button to discard them.
Relation Types Tab
In this tab, relation types are managed.
Add a new relation type
To add a new relation type you have to select the Relation Types tab and then press the + button in order to introduce the relation name in the chosen language. To confirm this operation, you have to press on the Save button and to cancel, on the Cancel one.
Modify a relation type
To modify a relation type you have to select it in the Relation Types tab and make changes to its texts in the available languages. Again, by using the Save button you confirm changes and cancel them with the Cancel button.
Delete a relation type
To delete a relation type, first you have to select it from the Relation types tab and then you have to press the X button. Finally, you have to confirm the deletion in the dialogue shown for this purpose.
Concept - Words Panel
This panel, located at the bottom of the window, allows you to associate words with the selected concept from the concepts tree.
Add a new word
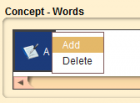
To add a new word and associate it with the selected concept you have to press the right button of the mouse over the Concept - Words panel and a popup menu will appear.
Select the Add option and the following window will appear.
You can create a new word or modify an existing one:
- Create a new word: You can create a new word by selecting New in the Word field. Next, you have to write the word and it's syllable separation in their respectives fields.
- Modify a word: Instead of selecting the New option, you have to select the desired word and then you can proceed to modify its information.
Delete a word
To delete a word associated to the selected concept, you have to press the right button of the mouse over the Concept - Words panel and select the Delete option.
Multimedia Resources
To access the panel that allows the management of the multimedia resources that will be used in PATIO, you have to press the Multimedia resources button located at the Importer/Exporter panel.
This panel is divided into tabs that allow you to create, modify or delete multimedia resources. Besides, resources can be associated with concepts or you can even add new files of different languages to an existing multimedia resource. Finally, there is another important feature that allows you to import/export packages of multimedia resources so you can export a package from a database and import it to another one and vice versa.
Note that multimedia resources must have a description in the same language as the user interface, or in the neutral language, in order to be correctly displayed in the multimedia resource tree.
Modify Resources
This tab contains the multimedia resource tree on the left; the resources list showing the resources filtered by the current selection, in the central zone; and the details of the chosen file, in the panel on the right.
Note that you can change the preview size and the order of the multimedia resources in the central list using the controls at the top of the central panel.
Cada fichero consta de los siguientes campos:
Each file has the following fields:
- File
- The name of the multimedia file.
- Type
- The type of the multimedia resource.
- Language
- The language in which the resource can be used.
- Image
- The image that represents the multimedia resource.
- Associations
- The list of concepts that this resource represents.
Modify a multimedia resource
To modify an existing multimedia resource, you have to select it from the resources list, make the desired modifications and finally press the Save button to confirm changes.
Note that each multimedia resource can be associated with several files (one for each language) in order to provide specific representations for all the available languages.
Finally, you have to keep in mind that if you add a concept to the Association List, you will get the same results as by dragging the multimedia resource over the Concepts - Resources Panel in the Concepts Tab.
Eliminar un recurso multimedia
Para eliminar un recurso multimedia se lo debe seleccionar del listado de recursos y pulsar sobre el botón Borrar confirmando la operación en la ventana que se visualiza a continuación.
Añadir Recursos
En esta pestaña se puede añadir recursos multimedia a la base de datos uno a uno.
En primer lugar se deberá seleccionar el directorio en el cual las imágenes residen utilizando el botón con el icono de una carpeta o bien escribiendo la ruta en el cuadro de texto dispuesto para este fin. A continuación se visualizarán los ficheros multimedia contenidos en dicho directorio de modo que al seleccionar uno de ellos pueda ser añadido a la base de datos completando previamente la información del mismo que consiste en:
- Tipo
- Tipo de recurso multimedia.
- Lengua
- El idioma en el que el recurso puede ser utilizado.
- Asociaciones.
- Las asociaciones opcionales a conceptos.
- Recursos Multimedia
- Indica si el nuevo fichero será un nuevo recurso multimedia (Opción Nuevo) o bien formará parte de la particularización en otro idioma de un recurso multimedia ya existente.
Para confirmar la creación del nuevo recurso (o la particularización en el idioma seleccionado) se deberá pulsar sobre el botón Añadir.
Nótese que los recursos multimedia que se visualizan en la lista del panel de edición dependen del idioma seleccionado para el fichero de manera que no será posible añadir más de un fichero para un mismo idioma al mismo recurso multimedia.
thumb|center|600px|Pestaña Añadir Recursos
Añadir Lote
En esta pestaña se pueden añadir varios recursos multimedia a la base de datos de una sola vez.
Al igual que en el caso anterior se deberá seleccionar el directorio en el cual las imágenes residen. Luego cuando se visualicen los ficheros multimedia contenidos en dicho directorio se seleccionarán los que se desee añadir utilizando el clic del botón principal del ratón junto con la tecla Control (Command en Mac) para la selección individual o junto con la tecla Mayúsculas para seleccionar un rango consecutivo de ficheros. Con el conjunto de ficheros seleccionados se escogerá en el panel lateral derecho las opciones que se utilizarán en el proceso:
- Lengua
- El idioma para el cual los ficheros serán utilizados
- Conceptos
- Marcando esta casilla se crearán (si aún no existían) los conceptos correspondientes con el nombre de cada fichero y se asociarán mutuamente.
- Relaciones
- Permite especificar que cuando se creen los nuevos conceptos, además se deberán crear las relaciones predefinidas empieza por, contiene y termina por.
Sólo resta pulsar el botón Añadir para que se ejecute la tarea y se incorporen los nuevos recursos multimedia a la base de datos.
Nótese que este método no es válido para añadir ficheros de otro idioma a un recurso multimedia ya existente. Dicha operación sólo puede realizarse desde la pestaña Añadir recursos.
thumb|center|600px|Pestaña Añadir Lote
Exportador de paquetes de recursos multimedia
La pestaña Exportador permite la creación de paquetes de recursos multimedia existentes en la base de datos con la que se está trabajando. Un paquete es un fichero que contiene toda la información necesaria de los recursos multimedia que incluye y que podrá ser importado desde otra base de datos.
thumb|center|600px|Exportador de paquetes de recursos multimedia
Añadir recursos multimedia al paquete
Los recursos multimedia pueden ser seleccionados utilizando el árbol Recursos multimedia situado a la izquierda y el panel central, que muestra los recursos multimedia seleccionados en el árbol Recursos multimedia. Los recursos que se deseen añadir al paquete deben ser seleccionados en el panel central y arrastrados con el botón principal del ratón hasta el panel Recursos multimedia seleccionados, donde se soltará el botón para terminar de añadir el recurso multimedia al paquete.
Quitar recursos multimedia del paquete
Para quitar recursos multimedia del paquete basta con seleccionar los recursos que se desean eliminar y pulsar el botón Eliminar situado en la barra de herramientas del panel Recursos multimedia seleccionados o bien presionar la tecla Supr del teclado.
thumb|center|400px|Botón quitar recursos
Exportar el paquete
Para proceder a la creación del paquete con los recursos multimedia que se han seleccionado se debe pulsar el botón Exportar situado en la parte inferior del panel Recursos multimedia seleccionados. A continuación, aparecerá una nueva ventana que permitirá seleccionar el nombre del paquete y el lugar donde se desea almacenar.
Nota: El paquete incluye los recursos multimedia seleccionados, así como todos sus conceptos asociados y los ficheros con sus imágenes, sonidos y/o vídeos.
Importador de paquetes de recursos multimedia
La pestaña Importador permite la importación de paquetes de recursos multimedia que hayan sido creados utilizando el exportador de paquetes.
thumb|center|700px|Importador de paquetes de recursos multimedia
En primer lugar, se pulsará sobre el botón Seleccionar paquete para buscar el paquete de recursos multimedia que se desea importar. Una vez seleccionado, su información aparecerá en el apartado Información del paquete. Por último, se pulsará el botón Importar recursos para comenzar el proceso de importación. El panel inferior irá mostrando el progreso e información sobre la importación.
Nota: La importación de recursos multimedia incluye, además, la importación de todos sus conceptos asociados en la base de datos en la que se creó el paquete y sus ficheros con las imágenes, sonidos y/o vídeos.
Plantillas para los ejercicios
Para acceder al panel que permite la gestión de las plantillas de los ejercicios que podrán ser usadas en PATIO, se deberá pulsar sobre el botón Plantillas situado en el panel Importador / Exportador.
Exportador de paquetes de plantillas
thumb|center|600px|Exportador de paquetes de plantillas
Añadir plantillas al paquete
El panel Plantillas disponibles, situado a la izquierda en la imagen anterior, muestra las plantillas disponibles en la base de datos actual. Para añadir plantillas al paquete, se seleccionarán las plantillas que se deseen añadir y se pulsará el botón Añadir situado en la parte central de la ventana y que se muestra en la siguiente imagen. Las plantillas serán añadidas al panel Plantillas seleccionadas situado en la parte derecha de la ventana.
thumb|center|50px|Botón añadir
Quitar plantillas del paquete
Para quitar plantillas que se añadieron previamente, se seleccionarán en el panel Plantillas seleccionadas y se pulsará la tecla 'Supr' del teclado o el botón borrar, situado en la parte central de la ventana y que aparece marcado en la siguiente imagen.
thumb|center|50px|Botón borrar
Exportar el paquete
Para proceder a la creación del paquete con las plantillas que se han seleccionado se debe pulsar el botón Exportar situado en la parte inferior del panel Plantillas seleccionadas. A continuación, aparecerá una nueva ventana que permitirá seleccionar el nombre del paquete y el lugar donde se desea almacenar.
Importador de paquetes de plantillas
La pestaña Importador permite la importación de paquetes de plantillas que hayan sido creados utilizando el exportador de paquetes.
thumb|center|700px|Importador de paquetes de plantillas
En primer lugar, se pulsará sobre el botón Seleccionar paquete para buscar el paquete de plantillas que se desea importar. Una vez seleccionado, su información aparecerá en el apartado Información del paquete. Por último, se pulsará el botón Importar recursos para comenzar el proceso de importación. El panel inferior irá mostrando el progreso e información sobre la importación.
Palabras
Para acceder al panel que permite la gestión de las palabras que podrán ser usadas en PATIO, se deberá pulsar sobre el botón Palabras situado en el panel Importador / Exportador.
thumb|center|600px|Panel para modificar palabras.
Modificar palabras
La pestaña Modificar palabras permite realizar algunas operaciones como añadir nuevas palabras o eliminar palabras de la base de datos.
Añadir palabras
Para añadir palabras:
- Presione el botón + en el árbol de palabras.
- Introduzca la nueva Palabra.
- Introduzca la separación en Sílabas.
- Presione el botón Aceptar.
Eliminar palabras
Para eliminar palabras:
- Seleccione la palabra en el árbol de palabras.
- Presione el botón - en el árbol de palabras.
El árbol de palabras se podrá ordenar según el número de Sílabas o su Acentuación. Las palabras que se visualizan en el árbol de palabras pueden filtrarse según los Filtros del panel de la derecha.
Exportador de paquetes de palabras
La pestaña Exportador permite la creación de paquetes de palabras existentes en la base de datos con la que se está trabajando. Un paquete es un fichero que contiene toda la información necesaria de las palabras que incluye y que podrá ser importado desde otra base de datos.
thumb|center|600px|Exportador de paquetes de palabras
Añadir palabras al paquete
El panel Palabras disponibles, situado a la izquierda en la imagen anterior, muestra las palabras disponibles en la base de datos actual. Para añadir palabras al paquete, se seleccionarán las palabras que se deseen añadir y se pulsará el botón Añadir situado en la parte central de la ventana y que se muestra en la siguiente imagen.
thumb|center|50px|Botón añadir
Las palabras serán añadidas al panel Palabras seleccionadas situado en la parte derecha de la ventana.
Quitar palabras del paquete
Para quitar palabras que se añadieron previamente, se seleccionarán en el panel Palabras seleccionadas y se pulsará la tecla 'Supr' del teclado o el botón borrar, situado en la parte central de la ventana y que aparece marcado en la siguiente imagen.
thumb|center|50px|Botón borrar
Exportar el paquete
Para proceder a la creación del paquete con las palabras que se han seleccionado se debe pulsar el botón Exportar situado en la parte inferior del panel Palabras seleccionadas. A continuación, aparecerá una nueva ventana que permitirá seleccionar el nombre del paquete y el lugar donde se desea almacenar.
Nota: Además de las palabras, se añadirán al paquete todos sus conceptos asociados.
Importador de paquetes de palabras
La pestaña Importador permite la importación de paquetes de palabras que hayan sido creados utilizando el exportador de paquetes.
thumb|center|700px|Importador de paquetes de palabras
En primer lugar, se pulsará sobre el botón Seleccionar paquete para buscar el paquete de palabras que se desea importar. Una vez seleccionado, su información aparecerá en el apartado Información del paquete. Por último, se pulsará el botón Importar recursos para comenzar el proceso de importación. El panel inferior irá mostrando el progreso e información sobre la importación.
Nota: Además de las palabras, se añadirán a la base de datos todos los conceptos que tuvieran asociadas las palabras en la base de datos en la que se creó el paquete.
Ejercicios
Para acceder al panel que permite importar y exportar ejercicios que podrán ser usados en PATIO, se deberá pulsar sobre el botón Ejercicios situado en el panel Importador / Exportador.
Exportador de paquetes de ejercicios
La pestaña Exportador permite la creación de paquetes de ejercicios existentes en la base de datos con la que se está trabajando. Un paquete es un fichero que contiene toda la información necesaria de los ejercicios que incluye y que podrá ser importado desde otra base de datos.
thumb|center|600px|Exportador de paquetes de ejercicios
Añadir ejercicios al paquete
Para añadir ejercicios al paquete, en primer lugar, se deberá seleccionar su grupo de ejercicios en el panel Grupo de ejercicios. A continuación, se seleccionará el tipo de ejercicio en el panel Tipo de ejercicio y aparecerá en el panel Ejercicios la lista de ejercicios pertenecientes al tipo de ejercicios seleccionado. Por último, se seleccionarán los ejercicios y se pulsará el botón Añadir situado en la parte central de la ventana y que se muestra en la siguiente imagen.
thumb|center|50px|Botón añadir
Los ejercicios serán añadidos al panel Ejercicios seleccionados situado en la parte derecha de la ventana.
Quitar ejercicios del paquete
Para quitar ejercicios que se añadieron previamente, se seleccionarán en el panel Ejercicios seleccionados y se pulsará la tecla 'Supr' del teclado o el botón borrar, situado en la parte central de la ventana y que aparece marcado en la siguiente imagen.
thumb|center|50px|Botón borrar
Exportar el paquete
Para proceder a la creación del paquete con las ejercicios que se han seleccionado se debe pulsar el botón Exportar situado en la parte inferior del panel Ejercicios seleccionados. A continuación, aparecerá una nueva ventana que permitirá seleccionar el nombre del paquete y el lugar donde se desea almacenar.
Importador de paquetes de ejercicios
La pestaña Importador permite la importación de paquetes de ejercicios que hayan sido creados utilizando el exportador de ejercicios.
thumb|center|700px|Importador de paquetes de ejercicios
En primer lugar, se pulsará sobre el botón Seleccionar paquete para buscar el paquete de ejercicios que se desea importar. Una vez seleccionado, su información aparecerá en el apartado Información del paquete. Por último, se pulsará el botón Importar recursos para comenzar el proceso de importación. El panel inferior irá mostrando el progreso e información sobre la importación.
